Leak Detection Report for Plumber Repairs: What to Review Before Work Starts
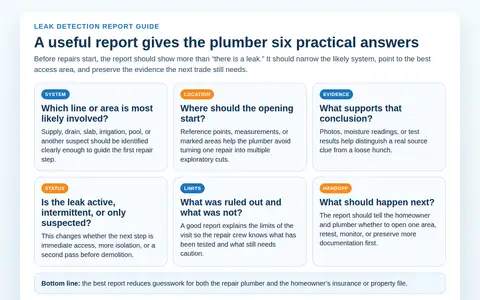
A leak detection report for plumber handoff should do more than repeat that a hidden leak exists. The next expensive mistake is often not the detection itself. It is starting repairs with a vague memory of what the technician said instead of a usable report, marked location, or photo set that the repair plumber can actually work from.
A good leak-detection report is not paperwork for its own sake. It is the bridge between "we know something is leaking" and "here is the most sensible place to open, test, or repair first." When that bridge is missing, the repair phase can slide back into guesswork. The plumber may still be skilled, but skill works better when the job starts with a tighter target.
That is why this part of the process matters so much for hidden leaks. Total Leak Detection's own article on trial-and-error plumbing versus leak detection makes the core point clearly: when the leak is hidden, locating it first can reduce the number of openings, the amount of finish damage, and the chances that the repair starts in the wrong spot. The report is what carries that value forward into the repair visit.

If your next move is handing the file to your own plumber, a property manager, or an insurance adjuster, here is how to tell whether the report is actually useful.
Why the report matters before the first repair opening
The first repair opening is where costs start multiplying. Drywall, tile, cabinets, flooring, or slab access may all be necessary in the right case. The problem is not that access happens. The problem is when access starts before the evidence is organized well enough to make that first opening smart.
Total Leak Detection's plumbing report writing page says its reports are used for insurance, real estate, legal, and repair documentation, and that the deliverable can include clear images, exact issue locations, analysis of findings, per-line repair estimates, and suggestions for repairs. That list matters because it tells you what the report is supposed to do after the technician leaves: preserve the job logic.
Its hidden-leak process article makes the same point from another angle. The visit is not just about narrowing the source that day. It is also about leaving you with a mark-out or report that helps the repair plumber plan the next step with more confidence. In other words, the report should prevent the repair phase from starting over from zero.
That is especially important when:
- the leak is behind finished walls or floors,
- the symptom showed up far away from the likely source,
- more than one system could be involved,
- or insurance documentation may matter later.
In those cases, a short verbal summary is rarely enough. The plumber who arrives later may not have seen the moisture pattern, the meter behavior, or the exact marks the detection technician used on site. The report needs to carry that context forward.
What a plumber actually needs from the report
Homeowners often assume the report only needs one sentence: "Leak found here." That is not enough for many hidden-leak jobs. A repair plumber usually needs a more practical handoff.
Start with the simplest question: Could a different qualified plumber pick up this file tomorrow and know where to begin?
If the answer is no, the report may still be too thin.
Here are the pieces that matter most:
| Report element | Why the plumber cares |
|---|---|
| Likely line or system involved | Helps separate supply, drain, slab, irrigation, or another suspect before the first cut |
| Reference point or marked location | Gives the crew a repeatable place to measure from instead of guessing based on memory |
| Photos of the area and evidence | Preserves what the symptom looked like before drying, cleanup, or demolition changes the scene |
| Activity status | Distinguishes a leak that appeared active during testing from one that seemed intermittent or only suspected |
| Limits of the inspection | Shows what was ruled out, what was not, and whether another test may still be needed |
| Recommended next step | Clarifies whether the job should move to one repair opening, more isolation, monitoring, or retesting |
That handoff is consistent with TLD's published guidance. The trial-and-error article says a useful report often describes the leak location relative to a reference point and notes whether the leak appeared active. The plumbing report page says the file should include clear images, exact locations, analysis, and repair suggestions. Put those together and you get a better standard than "the leak is probably in this bathroom somewhere."

One detail homeowners often miss is that the report does not need to sound technical to be useful. It needs to be specific. A plain-language note that says "highest evidence points to the cold-water supply line behind the vanity, approximately 18 inches right of the shutoff box, with moisture concentrated low on the wall" is far more valuable than a dense paragraph that never gives the repair crew a starting point.
Another useful distinction: a report is not the same thing as a repair quote. The quote tells you what work may cost. The report should tell you why that work is being recommended and where it is most likely needed.
How photos, reference points, and moisture findings reduce guesswork
The best leak-detection reports do not rely on one kind of evidence. They combine the location logic with visible proof.
This is where photos, measurements, and moisture findings earn their keep. By the time the repair plumber arrives, a wet baseboard may already be dry, a cabinet may be emptied, or a stain may look smaller than it did during the first inspection. Without photos or written reference points, the crew may be asked to reconstruct the earlier evidence from memory.
Total Leak Detection's hidden-leak process article says the handoff should help the plumber plan one informed opening instead of exploratory damage. That only works if the report preserves enough detail to show why one area became the stronger suspect than the next.

The most helpful clues in the file often include:
- a photo of the visible symptom,
- a wider room view that shows orientation,
- a marked distance from a fixture, cleanout, wall, or valve box,
- notes on which system was most likely involved,
- and the reason one area tested wetter or more suspicious than another.
Even when the final repair still requires opening a wall or slab, those details help the crew protect more of the surrounding finishes. They also make it easier to pause and re-check the plan if the first opening does not match the expected condition. That is a much better position than starting with a broad demolition guess.
This is also the section of the handoff where honesty matters. If the report says the source is suspected rather than fully confirmed, that should be obvious. If another possible source could not be ruled out during the visit, that should be obvious too. Clarity about limits is not a weakness. It helps the next trade avoid reading more certainty into the file than the testing actually produced.
What to document for insurance before permanent repairs begin
If insurance may be involved, the leak-detection report becomes part of a bigger record. The goal is not just helping the plumber. It is preserving the condition of the property before permanent repairs erase part of the evidence.
Florida's Department of Financial Services tells homeowners to document existing damage with photographs before making repairs, to keep receipts for emergency work, and not to make permanent repairs before an inspection by the insurance company adjuster when a claim is involved. The agency also separates emergency mitigation from permanent repairs: you may need to take reasonable steps to prevent further damage, but that does not mean racing into full rebuild work before the file is organized.
EPA's homeowner moisture guide adds another practical pressure point. Water-damaged materials and areas should usually be dried within 24 to 48 hours to reduce mold risk, and plumbing leaks or other water problems should be addressed quickly. That means homeowners sometimes have to balance two needs at once:
- preserve the evidence, and
- reduce ongoing water damage fast enough that the problem does not grow.
Those goals are not opposites. They just require sequence and documentation.

If a claim may be part of the job, try to keep:
- wide and close photos of the affected area,
- the leak-detection report or mark-out,
- notes about when the damage was first noticed,
- any meter, shutoff, or isolation notes that helped narrow the system,
- receipts and before-and-after photos for temporary protective work,
- and copies of any communication with the insurer, manager, or repair contractor.
That does not mean you should let the property sit wet for days while you wait on paperwork. If active water is spreading, turn off the water if safe, protect the area, and follow insurer instructions. The key point is that permanent repair work should not erase the evidence you may need later without first preserving it.
When to ask for retesting before demolition
Not every report should send the plumber straight into demolition the next morning. Sometimes the best next question is whether the file is strong enough yet.
Ask for clarification or another pass when:
- the report names a symptom area but not the likely line or system,
- the marked location is vague enough that two or three openings still seem equally possible,
- the leak was described as intermittent and the conditions have changed,
- the moisture pattern was broad and the report does not explain why one access point is favored,
- or the proposed repair opening does not match the evidence the plumber sees on arrival.
This is where homeowners can use the report intelligently instead of treating it like a final verdict. TLD's hidden-leak process article suggests asking whether the report is written or only verbal, whether it identifies the likely system involved, and whether photos are included. Those are good questions because they force the handoff to become specific.
A request for clarification is not redoing the whole job for no reason. It can be the cheaper move if it prevents a wrong opening. The goal is still forward progress. You just want to make sure the repair phase is moving from real evidence, not from assumptions that only sounded certain in the moment.
How to hand the report to your plumber
Once the report is ready, treat it like part of the repair scope, not an extra attachment nobody reads.
Before the repair visit, send or print:
- the full report or mark-out notes,
- the best photos of the area,
- any diagram or measurement that shows the reference point clearly,
- your short timeline of when the symptom appears,
- and any insurance or property-management instruction that affects access or timing.
Then ask one practical question:
"Do you have enough here to choose the first repair opening confidently, or is there anything you need clarified before work starts?"
That question does two helpful things. First, it shows whether the handoff is actually usable. Second, it gives the plumber a chance to spot a gap before finishes are opened.
If you still need the diagnostic side completed or cleaned up, TLD positions plumbing report writing, leak detection, and the broader hidden-leak process guide as part of the same chain: locate first, document clearly, then repair with a better target. And if you are ready to schedule service, the site's contact page is the direct handoff.
The best outcome is not "no opening ever happens." The best outcome is a repair that starts with enough evidence to protect time, finishes, and next-step decisions.
This article is for general information only, not legal, insurance, or repair advice. Claim procedures, repair scope, and leak conditions vary by property, so confirm the next steps with your insurer, leak-detection provider, and licensed plumber before permanent repairs begin.