Water Heater Leak or Nearby Pipe Leak? What to Check Before the Damage Spreads
If you are dealing with a water heater leak or nearby pipe leak, the expensive mistake is often not waiting too long to act. It is blaming the wrong thing too quickly. Water near a heater can mean the tank is failing, but it can also mean a loose connector, a relief-valve discharge issue, condensation, or another nearby plumbing problem that only happens to show up at the same spot.
That distinction matters because the next decision can get expensive fast. Replacing a heater that was not actually the source wastes money and leaves the real leak active. On the other hand, assuming the tank is fine when water is starting at the base can let a bigger failure develop behind the same utility-room door.
Total Leak Detection's own water-heater leak service page frames the problem the right way: look at the warning signs, the water pattern, and the likely cause before the repair path gets ahead of the diagnosis. Here is how to separate the most common possibilities without turning a manageable problem into a blind replacement or an unnecessary wall opening.

What the water pattern around the heater is telling you
The first useful question is not "Do I have water here?" It is "Where does the water seem to begin?"
When homeowners find damp concrete, a wet drain pan, or staining near the heater, they often look at the unit as one big suspect. In practice, the pattern is narrower than that. TLD's water-heater page separates visible warning signs such as pooling at the base, corrosion on the tank exterior, reduced hot water, unusual noises, and rust-colored hot water. Those clues matter because they do not all point to the same part of the system.
A few examples make the logic clearer:
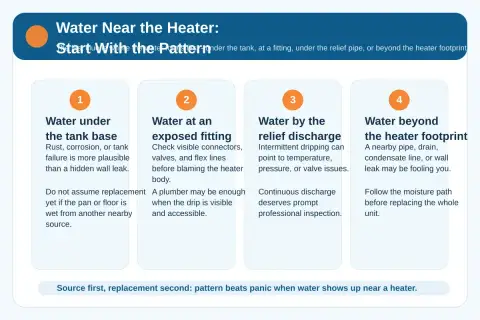
- Water seems to begin under the tank body itself: tank corrosion or internal failure becomes more plausible.
- Water beads at one exposed fitting or flex connector: the stronger suspect may be that visible connection, not the whole heater.
- Water shows up at the temperature-and-pressure discharge pipe or pan during heating cycles: the issue may involve pressure, temperature, or the valve itself.
- The tank body looks dry, but a nearby wall, slab edge, or baseboard stays damp: another pipe, drain, condensate source, or moisture path may be fooling you.
That is why pattern beats panic. One puddle can still come from several paths. The goal is to avoid telling yourself a simple story too early.
Signs the tank or relief valve may be the source
Sometimes the heater really is the problem. TLD's water-heater page lists several clues that deserve more attention: water pooling around the base, corrosion on the tank exterior, unusual noises, reduced hot water capacity, higher energy bills, and rust-colored hot water. Those signs fit the heater itself better than they fit a random nearby pipe.
A base-origin leak matters most when the tank shell shows rust, the pan keeps refilling from below the body, or the same area gets wet even when no other nearby connection looks active. TLD also notes that common causes include tank corrosion from age, sediment buildup, high water pressure, loose fittings, temperature-pressure relief valve failure, and a deteriorated anode rod. In other words, not every heater-area leak means the tank is split, but the heater has several built-in ways to become the main suspect.
The relief side needs its own caution. A little moisture at the temperature-and-pressure discharge point does not look the same as a tank-base failure. But it should not be ignored either. A DOE-supported permitting and inspection checklist for water heaters highlights the importance of a proper drain pan, safe T&P discharge routing, and visible checks for leaks or drips because those are practical places where real water damage starts. If the relief line is dripping steadily, if the pan fills mainly during heating cycles, or if high temperature or pressure seems to be part of the story, it is time for professional inspection rather than guesswork.
TLD's Florida prevention article also keeps the long-view risk in frame: water heaters are one of the most common sources of major water damage, and the company specifically recommends watching for rust, checking the relief valve, and treating older units more cautiously. That does not mean every older heater should be replaced on sight. It means the age and condition of the unit belong in the diagnosis, not outside it.

When a nearby pipe or fitting is the stronger suspect
This is the part many quick articles skip. Water around a heater does not automatically mean the heater failed.
A visible drip at a connector, shutoff, supply line, or nearby exposed pipe can be simpler than a tank failure. TLD's broader DIY and hidden-leak guidance consistently makes the same distinction: when the source is visible and accessible, repair often comes before detective work. A plumber may be enough when the water is plainly coming from one exposed point.
Nearby moisture can also lie to you. The floor may slope toward the heater. A damp wall cavity can weep toward the same corner. A condensation issue on a cold line can look worse in Florida's humidity than it really is. If your main question is whether the moisture is ordinary condensation on an exposed line rather than a hidden plumbing failure, TLD's pipe sweat or leak guide is the better companion read.
The clue that often changes the story is this one: the heater body stays dry while the surrounding materials do not. If the tank jacket, fittings, and discharge area stay mostly dry, but the adjacent wall, slab seam, or trim keeps re-wetting, another source becomes more believable.
That does not mean you ignore the heater. It means you stop treating it like the only suspect in the room.
How the meter and shutoff checks help
A meter test is not the first move in every heater-area leak. TLD's water meter test guide says the test is most useful when leak symptoms exist without a clear visible source, and less useful as the first step when the drip is already visible and accessible.
That is a helpful rule for this topic.
If a connector is obviously dripping in plain sight, the meter is not the main mystery. But if water keeps showing up near the heater and you still cannot tell whether the tank, an interior line, or another nearby source is responsible, the meter can help you decide whether a live plumbing problem is still active.
TLD's guide puts it plainly: if the meter stops after the house shutoff is closed, the stronger suspect is somewhere inside the home's plumbing. That may include a toilet, a fixture line, a water heater connection, or another indoor source. What the meter does not do is name the exact source for you.
That is the key limitation readers need to hear. A moving meter does not prove the heater tank is leaking. It proves water is still being used or lost somewhere in the system. It narrows the story, but it does not finish it.

Used the right way, the meter helps you avoid two bad assumptions:
- that every wet utility-room floor means the heater tank failed, and
- that a dry-looking tank means the problem must be harmless.
It is one more filter, not the whole diagnosis.
When to stop troubleshooting and call a plumber or leak detection
The right next call depends on whether the source is visible or still uncertain.
A plumber-first path is usually more reasonable when:
- one exposed fitting or valve is plainly dripping,
- the source is visible and reachable,
- the repair does not require guessing inside walls or floors,
- and the heater itself is not showing wider warning signs.
A leak-detection-first path becomes stronger when:
- water near the heater keeps returning but the exact source is unclear,
- the meter suggests ongoing interior water loss,
- the visible wet area does not match the part of the system you expected,
- the moisture may be coming from behind a wall, under a slab, or from another hidden line,
- or your next idea is to cut drywall or flooring just to see what happens.
TLD's hidden leak process article is especially useful here because it sets the right expectation: the goal of professional leak detection is not magic. It is to narrow the likely system, use the right non-invasive tools, and hand the repair over with a better target.
There is also a clear point where the DIY phase should stop for safety reasons. TLD says to stop and treat the problem as urgent when water is near outlets, electrical panels, or fixtures. The same common-sense caution applies around gas-fired equipment and active safety components. If the scene is no longer just "a little water by the heater," do not keep stretching the diagnosis because you hope it will stay simple.
What to document before cleanup or replacement
This section is where readers often save themselves the most money.
Before cleanup, replacement, or a service visit changes the scene, save a short record:
- wide and close photos showing where the water starts,
- a photo of the heater body, fittings, pan, and discharge area,
- notes on when the moisture appears,
- the approximate age of the heater,
- any recent repairs, valve changes, or unusual noises,
- and meter photos if a quiet-period check changed the story.
TLD's hidden-leak process article explicitly recommends photos, symptom timing, and clear access around the water heater or meter when safe. That advice matters here because heater-area moisture can stop looking the same once the floor dries, the pan is emptied, or the unit is moved.
EPA's 2026 WaterSense leak-detection guide adds one smart prevention layer for future incidents: it describes moisture sensors commonly placed near water heaters and explains that shutoff-capable leak-detection systems can limit damage from catastrophic failures such as a failed water heater or burst pipe. That will not solve today's mystery retroactively, but it is worth remembering once the current problem is resolved.

One last caution belongs here: do not replace the heater simply because water is nearby if the heater body still looks dry and another source remains plausible. The best replacement decision is the one made after the source story is strong enough to trust.
If you need help narrowing that story, start with TLD's leak detection service page for the diagnostic side or use the site's contact page to schedule service. The goal is not to overthink a wet floor forever. It is to make sure the next repair is aimed at the right problem.
This article is for general information only, not electrical, gas, insurance, or repair advice. Water heater layouts, shutoff setups, and plumbing paths vary by property, so confirm the source with a qualified professional before authorizing invasive work, replacement, or safety-related repairs.